Exactly what the title says, I am going to take you through the assembly of a box, with a piece of stitchery as the lid. I am either cheap or thrifty, your choice, but I am also a fast stitcher, and the cost of framing lots of pieces of stitchery becomes insane, especially if you want them to be right. Hence the wallhangery and quilting options I usually employ. This is a third option, for those things that are not really suited to wall hangings and cannot handle the treatment they would receive as a quilt. Like, for instance, the piece of goldwork I just finished.
So. I am doing a simple round box, using plastic canvas as the supporting sides and top and bottom. As you read down, I have included pictures of all the supplies, along with the fabric I am using for the sides. I found it at my local Jo-Ann's Fabrics and Crafts store, and it is even yummier in person than the pictures show.
 I was actually checking to see if they had any more of the silk dupione that either matched the blue I used or complemented it--gold would have been acceptable also. They had neither, so I went wandering through all the satins etc... Got to the brocades, saw lots of pretty fabric, then saw a flash of blue and gold. Dug it out of its niche, held the embroidery up to it, and figured I had a winner. There is a rose border that I am going to use as the box side, and an all over diaper (that is a diagonal pattern--I'll have to check why we now use that as a word for a baby's undergarment, yes?) pattern of large and small diamonds. Here is a picture of the front and back of the fabric.
 And here is a closeup of the edging...
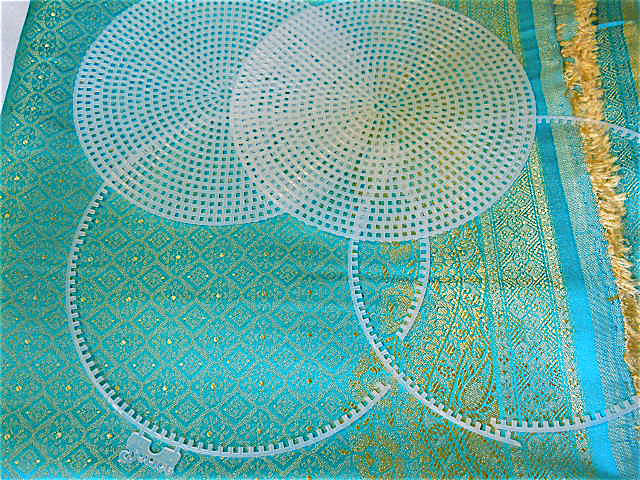
 With me so far? I also got four plastic canvas rounds, The original size is 6 inches, and trimmed the outer ring off two of them to use as the inside lid and inner bottom. I also have a piece of the very large stiff canvas, and cut a piece that is 2 x 19 inches for the box side, and one that is 1 x 19 for the lid. Hey, all you who didn't think you would ever use geometry after high school or college? Surprise! It is an easy formula, basically, Pi x the diameter of the circle. This gives the circumference of the circle, and I will _Never_Never_Ever_ forget the formula, although I did, in eighth grade, get a bit tired of the endless 20 problem worksheets we did while people were learning this. Um. I also remember Pi R Squared (for the area of a circle), and I think if you have either the radius or the diameter, you can figure out the other, being that the radius is half the diameter, so for our purposes, we need to multiply 3.14 and 6, which is 18.84 inches. With seven count (or seven stitches to the inch canvas, I will be adding an extra couple of rows for an overlap. I don't have to worry about the inner liner size because it is mostly there to look nice, and to cover the seams from the box and lid sides, when I gather them up and sew the sides onto the lid and base.
 This is the rings with the edges cut off.
 I am using felt to pad the canvas, so that it isn't prickly or hard, and it looks better. Just cut to fit. I also stitch it to the sides top and bottom so that it doesn't shift around.
 This is basic plastic canvas. It now comes in three sizes that I know of, seven count, ten count and fourteen count. The seven count is the stiffest, and it comes in two weights, one of which is stiffer than the other.
 Okay, I have gathered the edges of the stitched piece and sandwiched two felt rounds in between the plastic canvas disc and the stitched piece. For reference, this is a disc with a 4 and 1/2 inch diameter.
 The back of the lid, showing the basting/gathering stitches and some of the lacing. I have some more lacing to do, but I ran out of thread. This part is the trickiest of the box, as you can "pringle" the disc if you don't pull the lacing evenly. On the other hand, I can't lace a square or rectangle properly to save my life but I can do discs. Go figure. It is pretty easy to get the right tension, if it starts to look like a potato chip, lighten the tension ;-).
 Sewing thread, ball of yarn, large piece of plastic canvas, and four beads I am going to attach to the bottom of the box as feet. I use the yarn to attach the ends of the plastic canvas together, and sometimes I overcast the edges as well, for the look of the finished box.
THE Magpie
So. I am doing a simple round box, using plastic canvas as the supporting sides and top and bottom. As you read down, I have included pictures of all the supplies, along with the fabric I am using for the sides. I found it at my local Jo-Ann's Fabrics and Crafts store, and it is even yummier in person than the pictures show.




THE Magpie


